Enchantment Lakes
Various Dates,
Early 1970's
Under Construction — Come Back Later
Will be completed when more slides are digitized
The
Enchantment Lakes
(or simply "The Enchantments”)
is an area encompassing the granite peaks southwest of Leavenworth,
Washington.
While the official Enchantment Lakes designation covers a large area,
locals consider the central basin to be the real "Enchantments."
Fall classes at the University of Washington do not start until late
September,
so we developed the habit of spending the week before the start of
classes in the Enchantments.
These were idyllic times spent camping,
taking short hikes through the beautiful scenery and climbing the
multitude of challenging pinnacles.
In the early 1970's we simply packed in and enjoyed ourselves.
The area was relatively unknown:
in four one-week trips we met three other parties in the Enchantment
Lakes basin and I knew people in two of those parties;
probably it was one of them who had tipped me off about this wonderful
place.
Now access to the area is restricted and permits are handed out on a
lottery basis well before the area is snow-free.
No more than 60 persons at a time are allowed to stay overnight in this
sensitive ecosystem.
A sad result of the need to regulate use of the region is that climbers
who want to climb one of the peaks in the area must either wait years
for a permit or undertake a marathon march in,
climb and march out.
There are two main ways into the core of the Enchantments,
both typically done as a
two-day hike
because of the distance and elevation gain involved.
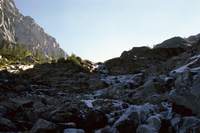
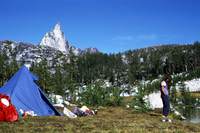
This picture taken looking up the approach to
Aasgard Pass
and the upper Enchantments illustrates one expects night-time
temperatures below freezing in late September.
The days tend to be pleasantly cool,
making the work of hiking and climbing a pleasure.
Given it takes two days to hike in and one day to hike out,
it made sense to spend significant time there,
so we usually planned 7 or more days for the trip.
Adding ropes,
pitons,
rock hammers and other technical gear to our packs in addition to food,
clothing,
sleeping bags and tents for a week-long stay meant we were carrying at
least 60 pounds each.
On one occasion,
we hiked in the previous weekend to cache food and equipment near the
lakes for an extended stay starting the following week.
That way,
we could eat well rather than exist on dehydrated food.
Aasgard Pass is the high end of the Enchantment basin at an elevation of
7,800 feet.
Winter is brutal at this elevation in the North Cascades;
the landscape is severe and the ecology very sensitive to human
intrusion.
The other commonly used approach is via
Snow Lakes.
On one occasion we happened to meet a friend while hiking in the
Enchantments;
they had taken the opposite approach from us so we traded car keys and
both did a traverse.
This picture,
taken on a hike on the ridge north and above Aasgard Pass,
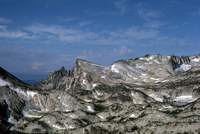
shows how austere the upper reaches of the Enchantments can be.
In the background are Dragontail
(left)
and Colchuck Peaks
(center).
The Colchuck Glacier lays between them.
The basin itself is more protected than the pass and its surrounding
peaks.
However,
the weather here is still severe and one of the few trees capable of withstanding
the climate is the
Larch,
a deciduous conifer.
Later in the season,
the Larch needles will turn golden yellow before falling off.
True conifers grow in sheltered areas and start to dominate as one descends
to lower elevations.
Some good pictures of the fall colors can be found
here.
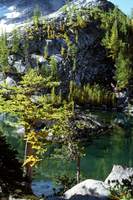
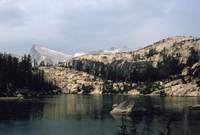
Over the years we took our pre-school breaks we camped at a number of
lakes in the upper and lower basin,
but our favorite camping area was at the middle level lakes at 7,000 feet.
These lakes offered a few grassy shores and very pleasant camping.
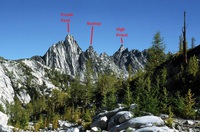
In the background of this picture is
Prusik Peak.
No climber worth their salt can pass on climbing this granite spire once
they have seen it.
Prusik Peak
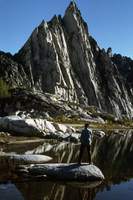
Before climbing we had to get the
classic picture
of Prusik Peak from Gnome Tarn.
(I asked my lady friend not to take that pose but she insisted.)
The route we took was the West Ridge,
going up the left profile in this picture,
mostly just the other side of the ridge.
However,
on the final lead to the summit we took a detour I have not found in any
route descriptions,
so I will claim the variation for myself!
Below and right of Prusik is the High Priest
(we'll get to him later).
If one clicks on the picture and zooms in to the High Priest,
on may understand why Fred Beckey was reminded of Nixon's Nose when
viewing from this angle.
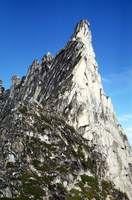
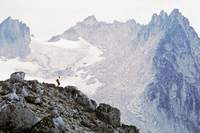
We hiked from our camp up to the pass west of Prusik Peak and got our
first view up the route we would be taking.
The summit is 400 feet above us.
Note:
the face of the High Priest can be seen at the extreme left of the
picture.
Boxtop is to the right of the High Priest.

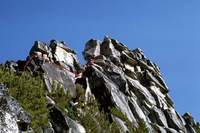
Once we got onto the ridge we felt like ants climbing up a jumbled pile
of children's blocks.
Some of the moves on this climb are rated 5.7
(on a scale of 5.0 to 5.9).
There were three of us on the climb:
me,
Chris and Barb
(both former students).
Since they did not yet have adequate experience with class 5 leading I
led the most difficult parts and let them cut their teeth on easier
sections.
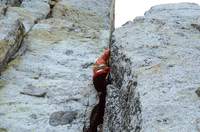
Sometimes comfortable belay positions were not to be found;
in this picture I appear to be laying down while belaying,
possibly for lack of a good place to stand.
Reclining probably put me closer to the piton I was using to anchor me
in case Chris fell.
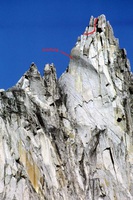
The southwest face of Prusik Peak,
as shown in this telephoto picture taken from the
Gnome Tarn vantage point,
is quite imposing.
The exposure near the top of the southwest face is daunting and made all
the more so by a slight overhang below the summit.
The overhang shows as a dark area above an almost blank face.
We took the West Ridge route,
as described in
Selected Climbs in the Cascades v1.
However,
the accepted West Ridge route ultimately goes directly up from a ledge
on the north side to the summit.
Once we were on the ledge,
we walked along it and looked down the southwest face.
Peering around to the upper face I saw what appeared to be an easy way
up,
albeit quite exposed.
There was a very solid belay position at the end of the ledge,
so I had Chris belay me while I stepped around onto the southwest face
and went up the slab to the summit
(red line).
Chris and Barb followed reluctantly,
even though they were in no danger with a well-secured upper belay.
There is no description of this variation in Beckey's guide or on the
web;
I suspect the exposure convinces others to take the more technically
difficult but less exposed line.
We rappelled off the north side of the summit to the ledge,
followed by more rappels and down-climbing to return to the pass west of
the mountain.
There we packed up our technical gear and hiked back to camp for a
relaxed dinner.
This picture shows the upper Enchantment basin from the summit of Prusik
Peak.
A ridge running from
Prusik Peak to Mount Temple
defines the north border of the lower basin of the Enchantment Lakes.
(This picture shows the western half of the ridge.)
There are many spires along this ridge that provide interesting climbs,
among them Boxtop and the High Priest.
From the lower basin,
Boxtop resembles a huge cereal box.
From many angles,
the High Priest resembles a head and elaborate headgear made of Legos.
This picture is a view of the southwest aspect of Boxtop.
The smaller structure to the left is known as
“Little Boxtop.”
For the climb of Boxtop,
I was with Sid and Kathy
(both former students).
The route begins by climbing part way up the west side of Little Boxtop,
then traversing a ledge to the east.
The ledge ends in a convenient platform where one can belay the most difficult
portion of the climb.
(The route and belay platform are shown in red.)
Upon reaching the platform,
it was Kathy's turn to belay and I took the lead for the difficult pitch.
Stepping off the platform,
one is immediately climbing with over 100 feet of exposure down a wide
chimney.
I placed a piton for protection and continued up the chimney to a fixed
piton apparently left on the first ascent.
I was getting a bit far above my last piton but figured I would soon
clip into the fixed piton and use it for
aid
as described in the guide.
I reached the piton,
grabbed it –
and it came right out!
I was so surprised I dropped it and then had to listen to it
“ping, ping, ping”
down the chimney as a reminder of the exposure.
When the piton came out,
I lost one of my foot holds and pivoted out,
held only by the fingers of one hand jammed into a crack and one foot on
a tiny flake.
I re-established hand and foot holds and regained my sang-froid,
but now was in too awkward and tenuous a position to replace the piton
with one of my own.
In these situations it is easier to go up than try to climb down.
It was about 10 feet straight down to my last protection,
so a fall would mean 20 feet of air before the rope came tight.
I outweighed Kathy by at least 40 pounds;
there would be a lot of
kinetic energy
for her to absorb.
I yelled to Kathy to be ready for a big fall and for Sid to help her break
the fall.
I managed to work my way up the rock a little way,
reached up and found a place to stick my left hand into a crack and
wedge it in by making a fist.
I started working my feet and other hand up the rock using the fist jam
to hold most of my weight.
As I moved up my left arm moved up as well,
causing my fist to rotate and slip down the crack.
I was finally pushing down with my left arm and about to push my fist
out of the crack when I reached a good hold with my right hand.
(This all took place where the red line goes behind a protruding block.)
From there it was an easy scramble to a comfortable belay spot where I
could settle down and be glad I had done an aid move
free.
A later edition of Beckey's guide classifies the move as a
“hard Class 5 move or aid.”
One must keep in mind that
“hard Class 5”
takes on special meaning in the Enchantments,
where rescue and medical care is at least a day away.
Kathy was unnerved by the difficulty of the section I had just done and
decided to remain at her belay spot to wait for Sid and I to complete
the climb.
Sid had the benefit of an upper belay to get past the difficult portion
and made it with some effort.
He then continued on to lead the easier portions beyond.
An interesting aspect of this route is that it proceeds through a
“tunnel”
onto the north side of the structure and continues to the summit from
there.
(The tunnel is where the red line ends.)
The High Priest
On a trip with Chris and Barb
(former students)
we ran into Loren,
my instructor in the Basic Climbing Course.
He was doing some climbs with a student of his.
Loren told me of his attempt on the High Priest and described a
difficult move that he had not been able to do.
“I'm sure you could do it,”
he said.
I offered to climb it with him the following day and told him where our
camp was and when we would be up.
Loren did not show up the next day and Barb decided to do some hiking so
I was left with Chris as a climbing partner.
The climb seemed relatively straightforward until I came to a wide ledge
ending with a 2-foot gap before a large block.
Stepping across the gap to climb the large block did not appear feasible
and I realized this must be the place Loren was talking about.
After some thought I solved the problem with a
layback
that got me up far enough to use a crack to jam up to a niche in the
large block.
From the niche was a short easy scramble to the top and the end of the
rope.
I went off belay and set up a belay to bring Chris up,
yelling down that the so-called
“difficult move”
was easy.
He did not want me to reveal the solution so he could solve the problem
himself.
He finally gave up and asked for a hint.
When I yelled
“layback”
he was soon with me on the summit.
We found many notes in the register at top describing the difficulties
encountered by those who had not solved the problem,
with many people rating the move as 5.8,
5.9 or aid.
Chris and I agreed it was 5.3 or 5.4 at best and wrote the secret to the
move in the register with a suggestion that those who did not agree
should rappel down and try it themselves.
Beckey's later guide rates the climb appropriately.
This picture shows what the difficult section looked like once one made
the transition from the layback to climb up to the niche.
Note the
nuts
slung off my left side.
At the time,
these were the latest thing in climbing.
They have since replaced by
friends.
Miscellaneous Pictures
The last half of September is still too early to see much of the glowing
yellow Larch needles,
but we did often encounter other signs of impending Fall.
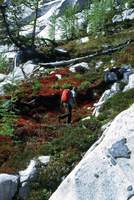
Barb's rucksack looks pretty full –
we must be on our way to climb something.
Some good pictures of the fall colors can be found
here.
One morning during breakfast I commented to Sid and Kathy that the clouds
looked ominous and we should spend the day off the summits.
Over my objections,
they insisted a hike up Enchantment Peak would be fine.
As we finished our breakfast a bolt of lightning struck the summit of
Enchantment Peak and a rain shower chased us under a tarp shelter we
had erected.
The rain shower was soon over and the skies cleared to the point I felt
it safe to hike up Enchantment Peak,
but they refused.
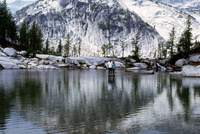
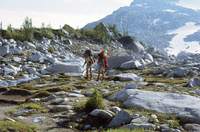
Most of the lakes are shallow and have rocks just below the surface.
We couldn't resist getting a picture of Sid and Kathy
“walking on water.”
This lake is fed by a small waterfall at right in the background.
Get Out!
One year we hiked into the Enchantments through forest fires;
it is strange that the trails were still open.
Since the hike in takes two days,
we spent one troubled night in the forest with small fires glowing on
the ridges around us.
Once we were in the Enchantments there was little fuel for the fires and
plenty of water.
If necessary,
we felt we could even move to the upper basin where there would be no
chance of fire.
In the days that followed,
helicopters buzzed about carrying firefighters to,
dumping water on and observing the fires.
On one of our climbs,
we saw a helicopter hover over our camp as we sat on a summit.
When we returned to camp in late afternoon,
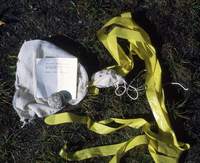
we found they had dropped a note:
AREA CLOSED - EXTREME FIRE DANGER
YOU ARE TO PACK UP & LEAVE THE
AREA IMMEDIATELY.
CHARLES F.
BANKO,
DISTRICT RANGER
What the ranger knew,
and we did not,
was that a major storm was approaching and previous storms had been
“dry,”
with lots of lightning and no rain.
They were concerned that what was already a record bad year for forest
fires was about to get much worse.
But it was too late for us to start hiking out;
if we did,
we would be in dense forest as night fell and did not want to repeat our
experience of the hike in,
where we had been worried about surrounding fires and beset by small
animals climbing over us in our sleeping bags and trying to gnaw their
way into our packs.
We elected to stay where we felt safe —
near the water and away from trees —
at least for this night.
As we stood looking at the note,
the helicopter returned and hovered over us;
we picked up the yellow ribbon from their message and waved it at them
to show we had gotten it.
The helicopter left with no further instructions.
At least they knew where to find us if things got bad.
We were pretty bummed out by this rude expulsion;
we wanted to stay longer.
Such is the nature of the Enchantments that we did not even know how
long we had been there.
I dug into my pack and determined I had dinner for that evening and one
for the next evening.
That night the storm arrived and dumped torrents of rain.
Everything was so wet the next day we decided to hike out rather than
spend another day.
We arrived in Leavenworth and headed straight to a cafe for our first
real meal in a week only to find every restaurant in Leavenworth
overflowing with firefighters.
The night's storm had extinguished the fires–and their jobs.